
博客迁移至CSDN,此处不再更新。新地址:https://blog.csdn.net/u014630623
mktime函数性能分析
mktime是一个将break-down时间(struct tm)转化为日历时间(time_t)的转换函数。它的转换与struct tm中的 tm_wday、tm_yday无关,当进行转换时,mktime会通过struct tm的其他成员重新矫正该值。若struct tm中的成员是非法的的,mktime将会自动校正,如2018-12-32 00:00:00,矫正后为2019-01-01 00:00:00。若给定struct tm不能转换为日历时间,则mktime返回-1。—-man mktime
1. 背景
背景:最近工作中遇到一个奇怪的问题,在将原先在32位机器上编译的程序放在64位机器上重新编译之后,然后放到IDC机器运行,发现性能降了100倍左右。在经过性能分析和查阅相关资料后发现,是由于mktime使用不当导致。
|
|
32位机器(i686)编译运行结果:
|
|
64位机器(x86_64 )编译运行结果:
|
|
造成上述问题的原因究竟是什么呢?
2. 源码分析mktime性能
2.1 mktime源码:
mktime.c123456789101112131415161718192021222324252627282930313233343536373839404142434445464748495051525354555657585960616263646566676869707172737475767778798081828384858687888990919293949596979899100101102103104105106107108109110111112113114115116117118119120121122123124125126127128129130131132133134135136137138139140141142143144145146147148149150151152153154155156157158159160161162163164165166167168169170171172173174175176177178179180181182183184185186187188189190191192193194195196197198199200201202203204205206207208209210211212213214215216217218219220221222223224225226227228229230231232233234235236237238239240241242/* Convert *TP to a time_t value. */time_tmktime (struct tm *tp){ /* POSIX.1 8.1.1 requires that whenever mktime() is called, the time zone names contained in the external variable 'tzname' shall be set as if the tzset() function had been called. */ __tzset (); return __mktime_internal (tp, __localtime_r, &localtime_offset);}/* Convert *TP to a time_t value, inverting the monotonic and mostly-unit-linear conversion function CONVERT. Use *OFFSET to keep track of a guess at the offset of the result, compared to what the result would be for UTC without leap seconds. If *OFFSET's guess is correct, only one CONVERT call is needed. This function is external because it is used also by timegm.c. */time_t__mktime_internal (struct tm *tp, struct tm *(*convert) (const time_t *, struct tm *), time_t *offset){ time_t t, gt, t0, t1, t2; struct tm tm; /* The maximum number of probes (calls to CONVERT) should be enough to handle any combinations of time zone rule changes, solar time, leap seconds, and oscillations around a spring-forward gap. POSIX.1 prohibits leap seconds, but some hosts have them anyway. */ int remaining_probes = 6; /* Time requested. Copy it in case CONVERT modifies *TP; this can occur if TP is localtime's returned value and CONVERT is localtime. */ int sec = tp->tm_sec; int min = tp->tm_min; int hour = tp->tm_hour; int mday = tp->tm_mday; int mon = tp->tm_mon; int year_requested = tp->tm_year; int isdst = tp->tm_isdst; /* 1 if the previous probe was DST. */ int dst2; /* Ensure that mon is in range, and set year accordingly. */ int mon_remainder = mon % 12; int negative_mon_remainder = mon_remainder < 0; int mon_years = mon / 12 - negative_mon_remainder; long_int lyear_requested = year_requested; long_int year = lyear_requested + mon_years; /* The other values need not be in range: the remaining code handles minor overflows correctly, assuming int and time_t arithmetic wraps around. Major overflows are caught at the end. */ /* Calculate day of year from year, month, and day of month. The result need not be in range. */ int mon_yday = ((__mon_yday[leapyear (year)] [mon_remainder + 12 * negative_mon_remainder]) - 1); long_int lmday = mday; long_int yday = mon_yday + lmday; time_t guessed_offset = *offset; int sec_requested = sec; if (LEAP_SECONDS_POSSIBLE) { /* Handle out-of-range seconds specially, since ydhms_tm_diff assumes every minute has 60 seconds. */ if (sec < 0) sec = 0; if (59 < sec) sec = 59; } /* Invert CONVERT by probing. First assume the same offset as last time. */ t0 = ydhms_diff (year, yday, hour, min, sec, EPOCH_YEAR - TM_YEAR_BASE, 0, 0, 0, - guessed_offset); if (TIME_T_MAX / INT_MAX / 366 / 24 / 60 / 60 < 3) { /* time_t isn't large enough to rule out overflows, so check for major overflows. A gross check suffices, since if t0 has overflowed, it is off by a multiple of TIME_T_MAX - TIME_T_MIN + 1. So ignore any component of the difference that is bounded by a small value. */ /* Approximate log base 2 of the number of time units per biennium. A biennium is 2 years; use this unit instead of years to avoid integer overflow. For example, 2 average Gregorian years are 2 * 365.2425 * 24 * 60 * 60 seconds, which is 63113904 seconds, and rint (log2 (63113904)) is 26. */ int ALOG2_SECONDS_PER_BIENNIUM = 26; int ALOG2_MINUTES_PER_BIENNIUM = 20; int ALOG2_HOURS_PER_BIENNIUM = 14; int ALOG2_DAYS_PER_BIENNIUM = 10; int LOG2_YEARS_PER_BIENNIUM = 1; int approx_requested_biennia = (SHR (year_requested, LOG2_YEARS_PER_BIENNIUM) - SHR (EPOCH_YEAR - TM_YEAR_BASE, LOG2_YEARS_PER_BIENNIUM) + SHR (mday, ALOG2_DAYS_PER_BIENNIUM) + SHR (hour, ALOG2_HOURS_PER_BIENNIUM) + SHR (min, ALOG2_MINUTES_PER_BIENNIUM) + (LEAP_SECONDS_POSSIBLE ? 0 : SHR (sec, ALOG2_SECONDS_PER_BIENNIUM))); int approx_biennia = SHR (t0, ALOG2_SECONDS_PER_BIENNIUM); int diff = approx_biennia - approx_requested_biennia; int approx_abs_diff = diff < 0 ? -1 - diff : diff; /* IRIX 4.0.5 cc miscalculates TIME_T_MIN / 3: it erroneously gives a positive value of 715827882. Setting a variable first then doing math on it seems to work. (ghazi@caip.rutgers.edu) */ time_t time_t_max = TIME_T_MAX; time_t time_t_min = TIME_T_MIN; time_t overflow_threshold = (time_t_max / 3 - time_t_min / 3) >> ALOG2_SECONDS_PER_BIENNIUM; if (overflow_threshold < approx_abs_diff) { /* Overflow occurred. Try repairing it; this might work if the time zone offset is enough to undo the overflow. */ time_t repaired_t0 = -1 - t0; approx_biennia = SHR (repaired_t0, ALOG2_SECONDS_PER_BIENNIUM); diff = approx_biennia - approx_requested_biennia; approx_abs_diff = diff < 0 ? -1 - diff : diff; if (overflow_threshold < approx_abs_diff) return -1; guessed_offset += repaired_t0 - t0; t0 = repaired_t0; } } /* Repeatedly use the error to improve the guess. */ for (t = t1 = t2 = t0, dst2 = 0; (gt = guess_time_tm (year, yday, hour, min, sec, &t, ranged_convert (convert, &t, &tm)), t != gt); t1 = t2, t2 = t, t = gt, dst2 = tm.tm_isdst != 0) if (t == t1 && t != t2 && (tm.tm_isdst < 0 || (isdst < 0 ? dst2 <= (tm.tm_isdst != 0) : (isdst != 0) != (tm.tm_isdst != 0)))) /* We can't possibly find a match, as we are oscillating between two values. The requested time probably falls within a spring-forward gap of size GT - T. Follow the common practice in this case, which is to return a time that is GT - T away from the requested time, preferring a time whose tm_isdst differs from the requested value. (If no tm_isdst was requested and only one of the two values has a nonzero tm_isdst, prefer that value.) In practice, this is more useful than returning -1. */ goto offset_found; else if (--remaining_probes == 0) return -1; /* We have a match. Check whether tm.tm_isdst has the requested value, if any. */ if (isdst_differ (isdst, tm.tm_isdst)) { /* tm.tm_isdst has the wrong value. Look for a neighboring time with the right value, and use its UTC offset. Heuristic: probe the adjacent timestamps in both directions, looking for the desired isdst. This should work for all real time zone histories in the tz database. */ /* Distance between probes when looking for a DST boundary. In tzdata2003a, the shortest period of DST is 601200 seconds (e.g., America/Recife starting 2000-10-08 01:00), and the shortest period of non-DST surrounded by DST is 694800 seconds (Africa/Tunis starting 1943-04-17 01:00). Use the minimum of these two values, so we don't miss these short periods when probing. */ int stride = 601200; /* The longest period of DST in tzdata2003a is 536454000 seconds (e.g., America/Jujuy starting 1946-10-01 01:00). The longest period of non-DST is much longer, but it makes no real sense to search for more than a year of non-DST, so use the DST max. */ int duration_max = 536454000; /* Search in both directions, so the maximum distance is half the duration; add the stride to avoid off-by-1 problems. */ int delta_bound = duration_max / 2 + stride; int delta, direction; for (delta = stride; delta < delta_bound; delta += stride) for (direction = -1; direction <= 1; direction += 2) if (time_t_int_add_ok (t, delta * direction)) { time_t ot = t + delta * direction; struct tm otm; ranged_convert (convert, &ot, &otm); if (! isdst_differ (isdst, otm.tm_isdst)) { /* We found the desired tm_isdst. Extrapolate back to the desired time. */ t = guess_time_tm (year, yday, hour, min, sec, &ot, &otm); ranged_convert (convert, &t, &tm); goto offset_found; } } } offset_found: *offset = guessed_offset + t - t0; if (LEAP_SECONDS_POSSIBLE && sec_requested != tm.tm_sec) { /* Adjust time to reflect the tm_sec requested, not the normalized value. Also, repair any damage from a false match due to a leap second. */ int sec_adjustment = (sec == 0 && tm.tm_sec == 60) - sec; if (! time_t_int_add_ok (t, sec_requested)) return -1; t1 = t + sec_requested; if (! time_t_int_add_ok (t1, sec_adjustment)) return -1; t2 = t1 + sec_adjustment; if (! convert (&t2, &tm)) return -1; t = t2; } *tp = tm; return t;}
tzset.c12345678910111213141516171819202122232425262728293031323334353637383940414243444546474849505152535455565758596061626364656667686970717273747576777879808182838485void__tzset (void){ __libc_lock_lock (tzset_lock); tzset_internal (1, 1); if (!__use_tzfile) { /* Set `tzname'. */ __tzname[0] = (char *) tz_rules[0].name; __tzname[1] = (char *) tz_rules[1].name; } __libc_lock_unlock (tzset_lock);}weak_alias (__tzset, tzset)/* Interpret the TZ envariable. */static voidinternal_functiontzset_internal (int always, int explicit){ static int is_initialized; const char *tz; if (is_initialized && !always) return; is_initialized = 1; /* Examine the TZ environment variable. */ tz = getenv ("TZ"); if (tz == NULL && !explicit) /* Use the site-wide default. This is a file name which means we would not see changes to the file if we compare only the file name for change. We want to notice file changes if tzset() has been called explicitly. Leave TZ as NULL in this case. */ tz = TZDEFAULT; if (tz && *tz == '\0') /* User specified the empty string; use UTC explicitly. */ tz = "Universal"; /* A leading colon means "implementation defined syntax". We ignore the colon and always use the same algorithm: try a data file, and if none exists parse the 1003.1 syntax. */ if (tz && *tz == ':') ++tz; /* Check whether the value changed since the last run. */ if (old_tz != NULL && tz != NULL && strcmp (tz, old_tz) == 0) /* No change, simply return. */ return; if (tz == NULL) /* No user specification; use the site-wide default. */ tz = TZDEFAULT; tz_rules[0].name = NULL; tz_rules[1].name = NULL; /* Save the value of `tz'. */ free (old_tz); old_tz = tz ? __strdup (tz) : NULL; /* Try to read a data file. */ __tzfile_read (tz, 0, NULL); if (__use_tzfile) return; /* No data file found. Default to UTC if nothing specified. */ if (tz == NULL || *tz == '\0' || (TZDEFAULT != NULL && strcmp (tz, TZDEFAULT) == 0)) { memset (tz_rules, '\0', sizeof tz_rules); tz_rules[0].name = tz_rules[1].name = "UTC"; if (J0 != 0) tz_rules[0].type = tz_rules[1].type = J0; tz_rules[0].change = tz_rules[1].change = (time_t) -1; update_vars (); return; } __tzset_parse_tz (tz);}
2.2 源码分析结论
从mktime的源码实现中可以看出,mktime的大致执行流程如下:
- 首先通过调用__tzset()对时区进行设置
- 若TZ环境变量为NULL,尝试调用__tzfile_read读取文件中的时区信息
- 只需要首次设置,若改变或为NULL重新设置
- 然后调用__mktime_internal进行时间转换
- 检查系统的tm_isdst(是否为夏令时)和传入的struct tm的tm_isdst,若两个不一致(isdst_differ),则进行矫正tm_isdst
从上源码可以得出结论:影响mktime性能的两个因素主要包括两方面,一是TZ设置是否为NULL,二是传入的struct tm参数的tm_isdst成员与系统的是否一致。
3. 实验分析mktime性能
3.1 TZ对mktime的性能影响
3.1.1 实验程序
|
|
3.1.2 实验结果:
|
|
3.1.3 实验结果分析
从源码分析可以知道,当TZ为NULL时,将会尝试读取文件,故不设置TZ时性能较低,约为设置的1/6
3.2 tm_isdst对mktime性能影响
3.2.1 实验程序
|
|
3.2.2 实验结果
|
|
3.2.3 实验结果分析
从上面可以看出,当tm_isdst与系统夏令时设置不一致的时候,性能为一致时的1/500左右。为什么将tm_isdst设置放在外面的时候性能又高了很多呢?从源码可以看出,当mktime对isdst进行矫正后,将正确的isdst存到了传入的结构体中,所以第二次进来时,isdst与系统一致,不需要矫正。
特别注意:当tm_isdst初始化为-1的时候,mktime设置是否为夏令时时间时失手编译器的设计影响,所以传入isdst=-1可能会得到错误的结果,即非夏令时按照夏令时计算或者夏令时按照非夏令时计算。
4. 背景中出现的问题以及mktime使用注意事项
4.1 背景中问题原因
通过实验程序以及原程序片段分析,运行过程中,在32位机器上的tm_isdst默认值为0,在64位机器上tm_isdst的默认值为1(与系统和内存环境有关,可能出现不同结果,我的机器上上述问题),导致在32位机器上运行时间较短,而且第一次运行时需要设置TZ环境变量,故第一次运行时间为
51us,后面运行时间较短。而64为机器一致运行时间为150us左右。
4.2 mktime使用注意事项
- 使用前建议设置TZ环境变量,在大量调用操作过程中,有助于将该部分性能提高到5~6倍.
- mktime函数中传入的tm的tm_isdst参数必须设置为0或1,若设置为-1可能会得到错误的结果,或者使用默认值导致性能大大降低,国内一般设置为0,因为中国不采用夏令时。
5. 参考链接:
https://github.molgen.mpg.de/git-mirror/glibc/blob/20003c49884422da7ffbc459cdeee768a6fee07b/time/mktime.c
https://github.molgen.mpg.de/git-mirror/glibc/blob/20003c49884422da7ffbc459cdeee768a6fee07b/time/tzset.c
https://blog.csdn.net/aquester/article/details/54669264
uname命令解析
使用uname命令可以帮助我们了解当前使用的系统的硬件信息,内核信息,处理器信息和当前使用的系统信息等。该命令可以在Fedora, Debian, CentOS, SUSE Linux 或者其他Linux操作系统的发行版本上运行。
uname命令的使用方法在网络上已经有很多,甚至直接使用man uname命令就可以获取uname的用法,所以不再赘述,本文主要记录uname打印的信息的具体信息的分析。
1. 查看内核信息
内核简单的理解就是硬件与用户程序之间的一层系统软件,它为应用程序提供了对计算机硬件访问的一套统一的接口,使得应用程序设计和编写更加简介和易用。
1.1 查看内核名称
uname -s[–sysname]12$ uname -sLinux
上述说明当前系统使用的是Linux内核,内核可以分为四大类:单内核、微内核、混合内核、外内核,Linux属于单内核。
详细可参考博客
https://blog.csdn.net/ciahi/article/details/1630083
https://blog.csdn.net/force_eagle/article/details/8729675
1.2 查看内核发行版本
uname -r[–kernel-release]
|
|
上述结果表示你使用的Linux内核版本为4.4版本的内核。下面解释一下每个数字对应的含义:
- 4 : 内核版本
- 4 : 主要修订版本
- 0 : 次要修订版本
- 97 : Bug fix版本号
- generic : 当前内核版本为通用版本,另有表示不同含义的server(服务器版本)、i386(针对老式英特尔处理器),或使用者定制的版本。
1.3 查看内核版本
uname -v[–kernel-version]
|
|
- SMP: 对称多处理机,表示内核支持多核、多处理器
- Wed Nov 19 10:24:30 CST 2014 : 内核的编译时间(build date)为(2014/11/19 10:24:30)
2. 硬件与处理器信息
2.1 查看硬件名称
uname -m[–machine]
|
|
该命令打印硬件名称,我们可以通过此属性判断操作系统的架构。
- x86_64 : 64位系统
- ix86 : 32位系统(x表示3、4、5、6)
2.2 查看硬件平台
uname -i[–hardware-platform]
|
|
硬件平台告诉我们构建内核的架构(可能会针对更高版本进行优化)。
2.3 查看处理器类型
uname -p
|
|
该属性表示该机器处理器的类型(CPU)
3. 其他信息
3.1 查看操作系统类型
uname -o[–operating-system]
|
|
该属性表名当前运行的操作系统为GNU/Linux
3.2 查看主机名
uname -n[–nodename]
|
|
3.3 查看全部信息
uname -a
参考链接:
http://man.linuxde.net/uname
https://blog.csdn.net/digimon/article/details/8607482
https://itsfoss.com/find-which-kernel-version-is-running-in-ubuntu/
https://blog.csdn.net/ciahi/article/details/1630083](https://blog.csdn.net/ciahi/article/details/1630083
https://ubuntu.dovov.com/2841/%E5%A6%82%E4%BD%95%E6%89%BE%E5%88%B0%E6%88%91%E7%9A%84pc%E5%92%8Cubuntu%E7%9A%84%E6%9E%B6%E6%9E%84%EF%BC%9F.html
分布式系统CAP定理与BASE理论
CAP定理
在计算机科学中,CAP定理指出,对于一个分布式系统,不能同时满足一下三点,最多只能同时满足其中两点:
- 一致性(Consistency):在分布式系统环境下,数据在多台机器上有多个副本。当对数据执行更新操作时,数据更新操作完成后,所有节点在同一时间的数据完全一致,客户端读取的数据永远是更新后的最新数据。
- 可用性(Availability) : 服务一直可用,即对于客户端每次读或写请求都能在有限时间内得到正确的响应,但不保证获取的数据为最新数据。 “有限时间内”是指对于客户端的每一个操作请求,系统必能够在指定的时间内返回对应的处理结果,如果超过了这个时间范围,系统将被认为是不可用的。
- 分区容错性(Partition tolerance) : 在网络分区出现故障时保证系统不受影响,仍让可以对外提供一致性和可用性服务。网络分区出现故障通常指的是节点之间的网络故障,但是节点内部网络是完好的,这种情况导致的问题就是节点之间无法进行数据复制。
CAP定理简单证明
由于分布式系统中多个节点分布在不同的机器(当然也可以是单台机器上的多个节点),节点之间通过网络进行通信,由于网络不完全可靠,所以在分布式系统中我们必须要满足分区容错性。若要舍弃分区容错性,也就是只有一个分区,何谈分布式系统,所以下面的讨论总是围绕分区容错性来讨论。当网络分区出现故障的时候,我们可以通过一定策略来达到一致性或可用性的要求。
一个简单的分布式系统如下:系统中有两个节点对外提供服务,Server1和Server2,Server1和Server2各自维护和访问自己的数据库DB1和DB2,DB1和DB2数据通过复制技术保证数据之间的同步。
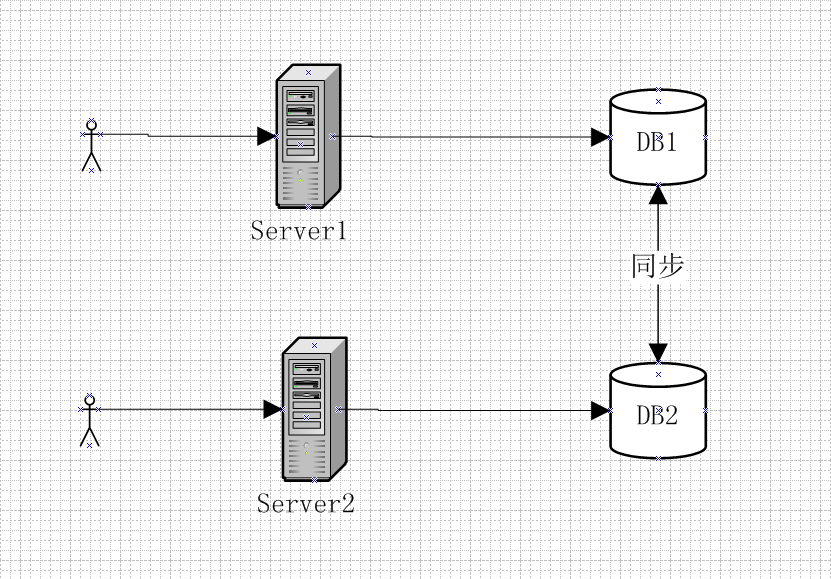
在理想情况下,即同时满足CAP的情况,DB1和DB2的数据是完全一致的,Server1与Server2可以同时对外提供服务,用户不管是请求server1还是请求server2,都会得到立即响应,并且获取的数据是完全一致且为最新数据。
但是现实中不可能出现这么理想的情况,当DB1和DB2之间网络发声故障时,此时有用户向Server1发送数据更新请求,DB1数据更新后无法将最新数据同步到DB2,此时DB2中存储的任然是旧数据;这个时候,有用户向Server2发送读数据请求,由于数据还没有同步,应用程序无法将最新的数据返回给用户,这个时候有两种选择:
- 牺牲数据一致性,保证服务可用性。Server返回DB2中的旧数据给用户
- 牺牲服务可用性,保证数据一致性。阻塞服务请求,直到故障恢复,DB1与DB2数据同步完成之后再恢复提供服务。
从上面分析可以看出,分布式系统不可能同时满足CAP。在实际应用的过程中,由于不能同时满足CAP,我们必须舍弃其中之一,由于P是所有分布式系统中不许满足的,所以最后需要在C和A之间做个取舍。
在大多数的分布式数据库中(如redis、Hbase等),往往是优先保证CP,因为无论是分布式系统还是想zooKeeper这种分布式协调组件,数据一致性往往是他们最基本的要求。
对于需要保证高可用性的系统,将舍弃数据一致性而保证服务的高可用性。如12306
Base理论
Base理论是Basically Available(基本可用)、Soft state(软状态)、Eventually consistent(最终一致性)的缩写;它基于CAP定理逐步演化来的,它是CAP中一致性和可用性权衡的结果,其核心思想是即使系统无法达到强一致性,可以根据应用自身的业务特点,采用适当的方式来使系统达到最终一致性。
基本可用(Basically Available)
基本可用是指当分布式系统发生故障的时候,允许损失部分可用性。常见的有以下几种情况:
- 响应时间上的损失:正常情况下,一个在线搜索引擎需要再0.5秒之内返回给用户响应的查询结果,但由于出现故障,查询结果的响应时间增加到了1~2秒。
- 功能上的损失:通常的做法是降级服务,如对于展示一些有序元素的页面,但部分组件出现故障时,这个时候可不展示有序元素,降级为无序元素列表。
软状态
软状态是指允许系统中的数据存在中间状态,并认为该中间状态的存在不影响系统的整体可用性,即允许系统不同节点的数据副本之间进行数据同步的过程中存在延时。
最终一致性
最终一致性强调的是系统所有的数据副本,在经过一段时间的同步后,最终能够达到一个一致的状态。因此,最终一致性的本质是需要系统保证最终数据能够达到一致,而不需要试试保证系统数据的强一致性。 具体最终一致性的实现方法见之前一致性相关博客:
https://langzi989.github.io/2018/11/20/分布式系统数据一致性/
参考链接:
http://robertgreiner.com/2014/08/cap-theorem-revisited/
https://www.hollischuang.com/archives/666
分布式系统中的数据一致性问题
数据一致性
数据库系统中的数据一致性
数据一致性问题最初是存在于数据库系统中的一个概念,数据库系统中一致性问题通常指的是关联数据之间的逻辑是否完整和正确,通常数据库系统会通过使用事务来保证数据的一致性和完整性。事务本质上就是一个操作序列的有限集合,若事务中有的操作没有成功完成,则事务中的所有操作都需要被回滚,回到事务执行前的状态。
比如当你在淘宝中购买商品进行付款的时候,从宏观上看有以下最基本的步骤:付款成功—->发放商品,若用户付款成功之后,发放商品失败,这个时候会导致数据不一致。解决这种问题常用的方法就是使用事务,若付款成功,发放商品失败,此时将第一个操作回滚。
分布式系统中的数据一致性
在分布式系统中,为了达到系统容灾和提高系统性能,数据通常会冗余存储在不同机器,通过复制技术来进行主副本之间的数据同步。所以分布式系统中的数据一致性指的是集群中主副本数据内容的一致性
由于数据冗余在不同机器中,当集群中部分机器挂掉,也可以正常对外服务,消除单点故障
集群中的主副本同时对外提供服务,提高系统对外提供服务的性能
分布式系统数据一致性模型
根据对数据一致性的强弱可以将一致性划分为强一致性、弱一致性和最终一致性三种模型。可以通过一个例子来理解这三种一致性之间的区别与关联。
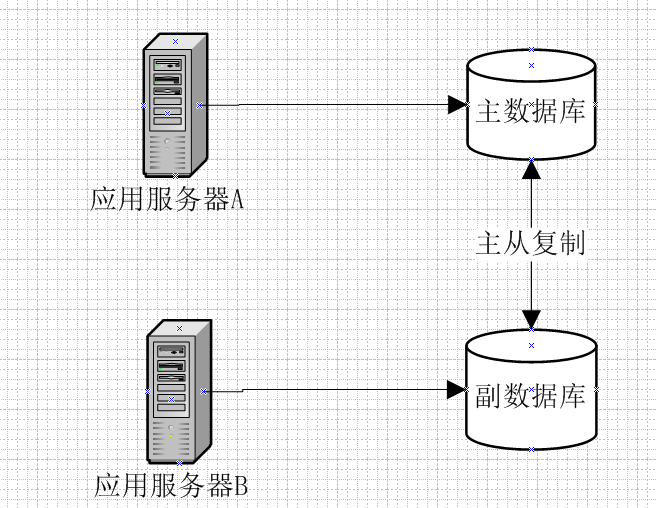
如某运营号在今日头条对一篇文章做了修改,文章存储于主副数据库,主副数据库均对外提供服务,如下:
强一致性
强一致性指的是当对数据完成更新操作之后,所有客户端访问到的数据均为更新之后的数据,这样可以保证客户端取到的总是最新的数据。要达到强一致性,将会牺牲较大的性能。
对应上述今日头条文章的例子,当运营号修改文章A之后,用户不管是通过应用服务器A访问还是通过应用服务器B访问文章都将访问到最新更新的文章。
弱一致性
弱一致性指的是当数据完成更新操作之后,系统并不保证所有的客户端访问到的数据为最新数据,但是会尽量保证在某个时间级别(如秒级或分钟级)之后,让数据达到一致性状态。
对应上述今日头条的例子,当运营号修改文章A之后,通过应用服务器B访问的用户并不能保证获取到的一定是最新的文章,但是可以保证在一段时间之后,访问的一定是最新的文章
最终一致性
最终一致性是弱一致性的一种特例。当对数据更新完之后,保证没有后续更新的前提下,系统最终返回的是上一次更新操作的值。
对应今日头条的例子,当运营号修改文章A之后,通过应用服务器A和B访问的用户最终获取到的文章一定是更新之后的文章。
最终一致性又衍生出以下几种一致性模型:
- 因果一致性:如果A进程在更新之后向B进程通知更新的完成,那么B的访问操作将会返回更新的值。如果没有因果关系的C进程将会遵循最终一致性的规则。
- 读己所写一致性:因果一致性的特定形式。一个进程总可以读到自己更新的数据。
- 会话一致性:读己所写一致性的特定形式。进程在访问存储系统同一个会话内,系统保证该进程读己之所写。
- 单调读一致性:如果一个进程已经读取到一个特定值,那么该进程不会读取到该值以前的任何值。
- 单调写一致性:系统保证对同一个进程的写操作串行化。
C++输入输出流详细理解
今天重读C++ Primer时,重新回顾了一下C++中iostream标准库,标准库提供了四个标准输入输出流,包括输入流cin和输出流cout,cerr,clog。cerr通常用来输出警告和错误信息给程序的使用者,而clog对象用于产生程序执行的一般信息。
定义
|
|
标准输入流
iostream标准库中标准输入流中只有cin一个,指的是从输入设备(如键盘)中向程序输入数据,程序通过cin从标准输入流中获取数据。
|
|
标准输出流
iostream标准库中提供的输出流有cout,cerr,以及clog三个。
cout,cerr与clog区别
这三个输出流到底有什么区别呢?根据GNU官方的解释,其区别如下:
- cout : 输出数据经过缓冲区(buffered[标准输出流的缓冲区]),可被重定向
- cerr: 输出数据不经过缓冲区(unbuffered),不可被重定向
- clog:输出数据经过缓冲区(buffered[标准错误流的缓冲区]),不可被重定向
参考链接:
https://gcc.gnu.org/onlinedocs/gcc-4.6.0/libstdc++/api/a00914_source.html
https://gcc.gnu.org/onlinedocs/gcc-4.6.0/libstdc++/api/a01140.html#a7e2a2fc4b5924b7292c0566ca4c95463
实验程序
|
|
从上面的实验结果可以看出,cout与cerr的行为与上述cout和cerr的区别一致,但是从现象看clog并没有buffered,这是什么原因呢?
产生上述现象的原因从上面三个输出流的定义可以看出,cout是使用的标准输入(stdout)的缓冲区,clog是使用的标准错误流(stderr)的缓冲区,由于stderr的缓冲区大小默认为0,所以虽然clog输出流有缓冲,但是缓冲区大小为0,所以上述效果与无缓冲一致。
可通过设置标准错误流的缓冲区来达到clog缓冲的效果。
|
|
endl与\n区别
在使用endl与\n的作用相同,但是还是有一些区别的。
- 对于无缓冲的输出流如cerr,endl与\n完全一致。
- 对于带缓冲的输出流cout和clog,\n仅仅输出换行,而endl除了输出换行之外,还刷新输出流或错误流缓冲区。
|
|
既然\n不刷新缓冲区,那为什么第二个程序在输出到terminal的时候会在sleep前打印123呢?这是由于当打印到屏幕上的时候,输出流的缓冲为行缓冲,当重定向到文件中时候,输出流缓冲为全缓冲
行缓冲与全缓冲
从上面可以看出标准输出在输出到屏幕和输出到文件中默认的缓冲类型不一致,当输出到屏幕的时候,为行缓冲;当输出到文件的时候为全缓冲。
- 全缓冲:填满标准I/O缓冲区才进行实际的I/O操作。
- 行缓冲:当缓冲区内容遇到换行时,即进行实际的I/O操作。
所以当cout打印到屏幕上的时候,使用cout<<”\n”,也会立即显示结果。
AWK是一种强大的文本处理工具,其处理文本的效率极高,其输出可以来自标注输入、其他命令的输出或一个或多个文件,熟练使用awk将会对工作效率有很大的提升。
awk调用方式
awk调用方式包括三种:
一、命令行调用
|
|
commond的组成又可以包括多个模式和动作的组合,即命令行调用又可以写为:
|
|
- seperator:分隔符。分隔符为可选参数,可以为任意字符串,若不指定,默认分隔符为空格。
- commond:awk命令
- input_file: 待处理的文本文件
二、脚本调用
|
|
将awk命令写入一个文件中,然后使用-f参数指定该文件运行
三、shell脚本插入awk命令
在shell中插入awk命令对文件进行处理,直接执行shell命令。
模式与动作
任何awk语句都由**模式**和**动作**组成,**模式部分决定Action语句何时触发以及触发事件,动作决定对当前被匹配的数据进行的操作**,Action中由多个awk处理语句组成。
|
|
注意问题:
- awk语句必须被单引号或双引号包含,防止awk语句被当做shell命令解析。
- 确保awk命令中所有引号都成对出现
确保用花括号括起来动作语句,用圆括号括起来条件语句
模式与动作一一对应,只有pattern匹配成功,对应的action(用{}括起来表示一个action)才会执行。
模式可以为任何条件语句或复合语句或正则表达式,也可以为awk保留字BEGIN,END
模式尽量不要加双引号,否则某些情况下可能会失效,如”$1>30”。
action一定要用{}括起来,一个{}括起来的动作属于一个action,不同{}括起来的动作属于不同action,其对应不同的pattern。
BEGIN和END为特殊的模式,BEGIN模式使用在任何文本浏览之前,常用来做一些初始化设置或打印头部信息等,END模式使用在完成文本浏览动作之后,常用来处理一些收尾打印等工作。注意BEGIN和END语句都仅且执行一次
awk基本用法
假定一下为一个学校中抽样的几个学生的成绩(score.txt),下面四列分别为学号,名字,年级,分数:
|
|
域标识
awk从输入文件中**每次读取一行**,当遇到分割符时将其分割为域,这些域被标记为\$1,\$2,\$3...,直到读到文件结尾或文件不存在,$0表示当前记录(即当前行)。
示例:
|
|
条件控制语句
关系与正则运算符:
| 符号 | 描述 |
|---|---|
| < | 小于 |
| <= | 小于等于 |
| > | 大于 |
| >= | 大于等于 |
| == | 等于 |
| ~ | 匹配正则表达式(二元 符号前面为被匹配的字符串,后面为模式串,一般模式传用/pattern/括起来) |
| !~ | 不匹配正则表达式 |
逻辑运算符
逻辑运算符与C语言中完全一致。
| 符号 | 描述 | ||
|---|---|---|---|
| && | 且,两个条件同时满足才为真 | ||
| \ | \ | 或,只要有一个条件为真即为真 | |
| ! | 将结果取反(一元运算符) |
关键字
| 关键字 | 描述 |
|---|---|
| break | 用于while或for循环,退出循环 |
| continue | 终止当前循环,执行下一个循环 |
| next | 导致读入下一个输入行,并返回到脚本的顶部。这可以避免对当前输入行执行其他的操作过程。 |
| exit | 退出执行,直接跳转到END执行,若没有END,终止脚本 |
if条件控制语句
在awk中使用if判断条件时,必须将if后面的条件用()括起来,与C语言类似。
|
|
当然我们使用模式代替if条件判断,这个可以达到相同的效果
|
|
for循环控制语句
语法
|
|
使用示例
|
|
while循环控制语句
语法:
|
|
使用示例
|
|
do while循环控制语句
语法:
|
|
使用示例
|
|
awk运算
算术运算符
| 符号 | 描述 |
|---|---|
| + - * / % | 加/减/乘/除/取余 |
| ++ | 自增1 |
| – | 自减1 |
| + | 一元加操作符,将操作数乘以1 |
| - | 一元减操作符,将操作数乘以-1 |
| ^ | 求幂。如2^2=4 |
赋值运算符
| 符号 | 描述 |
|---|---|
| = | 赋值 |
| +=、-=、*=、/=、%=、^= | 将左右操作数进行对应操作,然后赋值给左操作数(与C语言完全一致) |
其他运算符
| 符号 | 描述 |
|---|---|
| $ | 字段引用(引用域) |
| ? : | 条件表达式(与C语言一致) |
| 空格 | 字符串连接符 |
| in | 判断数组中是否存在某个键值 |
运算符优先级:
awk数组
awk数组是一种关联数组,其下标既可以是数字,也可以是字符串。
- 无需定义,数组在使用时被定义
- 数组元素的初始值为0或者空字符串
- 数组可以自动扩展
使用示例:
|
|
awk内置变量
| 变量 | 描述 |
|---|---|
| ARGC | 命令行参数个数,awk后参数个数 |
| ARGV | 命令行参数数组,数组下标从0开始 |
| ENVIRON | 系统环境变量数组 |
| FILENAME | 输入文件的名字 |
| FNR | 浏览文件的记录数(文件中的记录数,若多个文件不会累加) |
| NR | 已读记录数(已读的记录数,若多文件会离家) |
| NF | 浏览记录域的个数(即每行分割的域的最大值) |
| FS | 设置域分割符,常用于BEGIN中设置域分割符 |
| RS | 设置记录分隔符,原记录分隔符默认为换行,即一行一行读取,可使用该参数控制其不按照行读取 |
| OFS | 设置输出域分隔符,原域默认分隔符为空格,可使用此分隔符修改 |
| ORS | 设置输出记录分隔符。原记录默认分隔符为换行,可使用此参数修改 |
使用示例:
|
|
FNR与NR区别
|
|
awk内置函数
计算相关函数:
| 函数 | 描述 |
|---|---|
| cos(expr) | 计算余弦值,参数为弧度 |
| sin(expr) | 计算正弦值,参数为弧度 |
| int(expr) | 取整 |
| log(expr) | 计算expr的自然对数 |
| sqrt(expr) | 计算expr的平方根 |
|
|
注意:awk字符串下标从1开始不是从0开始
字符串相关函数:
| 函数 | 描述 |
|---|---|
| sub(src,des) | 将0中src第一次出现的子串替换为des |
| sub(src,des,str) | 将字符串str中第一次出现的src替换为des。 |
| gsub(src,des) | 将0中的src全部替换为des,若0中包含src,则返回1否则返回0 |
| gsub(src,des,str) | 将字符串str中的所有src替换为des, |
| index(str,substr) | 返回str中字符串substr首次出现的位置,位置从1开始,若未找到则返回0 |
| length(str) | 返回str的长度 |
| match(str, substr) | 测试str中是否存在子串substr |
| split(str,result,sep) | 将str以sep为分割符分割为数组,并存到result中 |
| printf(format,…) | 格式化输出,与C语言类似 |
| substr(str,start) | 返回从start开始一直到最后的子字符串,与C++类似 |
| substr(str,start,n) | 返回从start开始长度为n的子字符串,与C++类似 |
常用printf format
| format | 说明 |
|---|---|
| %c | ascii字符 |
| %d | 整数 |
| %e | 浮点数,科学计数法 |
| %f | 浮点数(如1.234) |
| %o | 八进制数 |
| %x | 十六进制数 |
| %s | 字符串 |
更多format详见(http://wiki.jikexueyuan.com/project/awk/pretty-printing.html)
|
|
AWK几个例子
文件去重并统计相同记录出现次数(保留记录原来的顺序)
|
|
文件内容合并
|
|
找出文件A中存在且文件B中不存在的记录
|
|
CRC循环冗余校验
CRC(Cyclic redundancy check)又称为循环冗余校验,它是一种根据网络数据包或电脑文件等数据产生简短固定位数校验码的一种散列函数,主要用于检测或校验数据传输或者保存后可能出现的错误。生成的校验码在传输或者存储之前计算出来并附加到数据后面,然后接收方进行检验确定数据是否发生变化。
数据通讯校验方法
数据通讯中常见的几种校验方法包括以下几种:
- 奇偶校验/bit校验
- 累加和校验
- 循环冗余校验
奇偶校验
奇偶校验算法包括两种类型,分别是奇校验位和偶校验位。它表示一个给定位数的二进制数中的1的个数是奇数个还是偶数个。
奇偶校验的原理是在发送的每一个字节后都加一位,使得每个字节中1的个数为奇数个或者偶数个(若为奇校验,则1的个数是奇数个,若为偶校验,1的个数为偶数个)。
如要传输的数据为1001 0010 0010 0001。
若采用奇校验,则将每个字节补位,传输的数据为1001 0010 0 0010 0001 1
若采用偶校验,则将每个字节补位,传输的数据为1001 0010 1 0010 0001 0
奇偶校验的缺点是
- 检测出错的概率较大,错误率在50%左右。
- 由于对于每个字节都需要补位,所以对传输性能影响较大。
累加和校验
累加和校验的实现方式有很多种最常用的一种是在一次通讯数据包的最后加入一个字节的校验数据,这个字节的内容为数据包中全部数据的忽略进位的按字节累加。如:
要传输的数据为:
1、2、3
加上校验和之后的数据包为:
1、2、3、6
累加和校验的缺点:
当校验单字节时,有1/256的出错概率。
循环冗余校验(CRC)
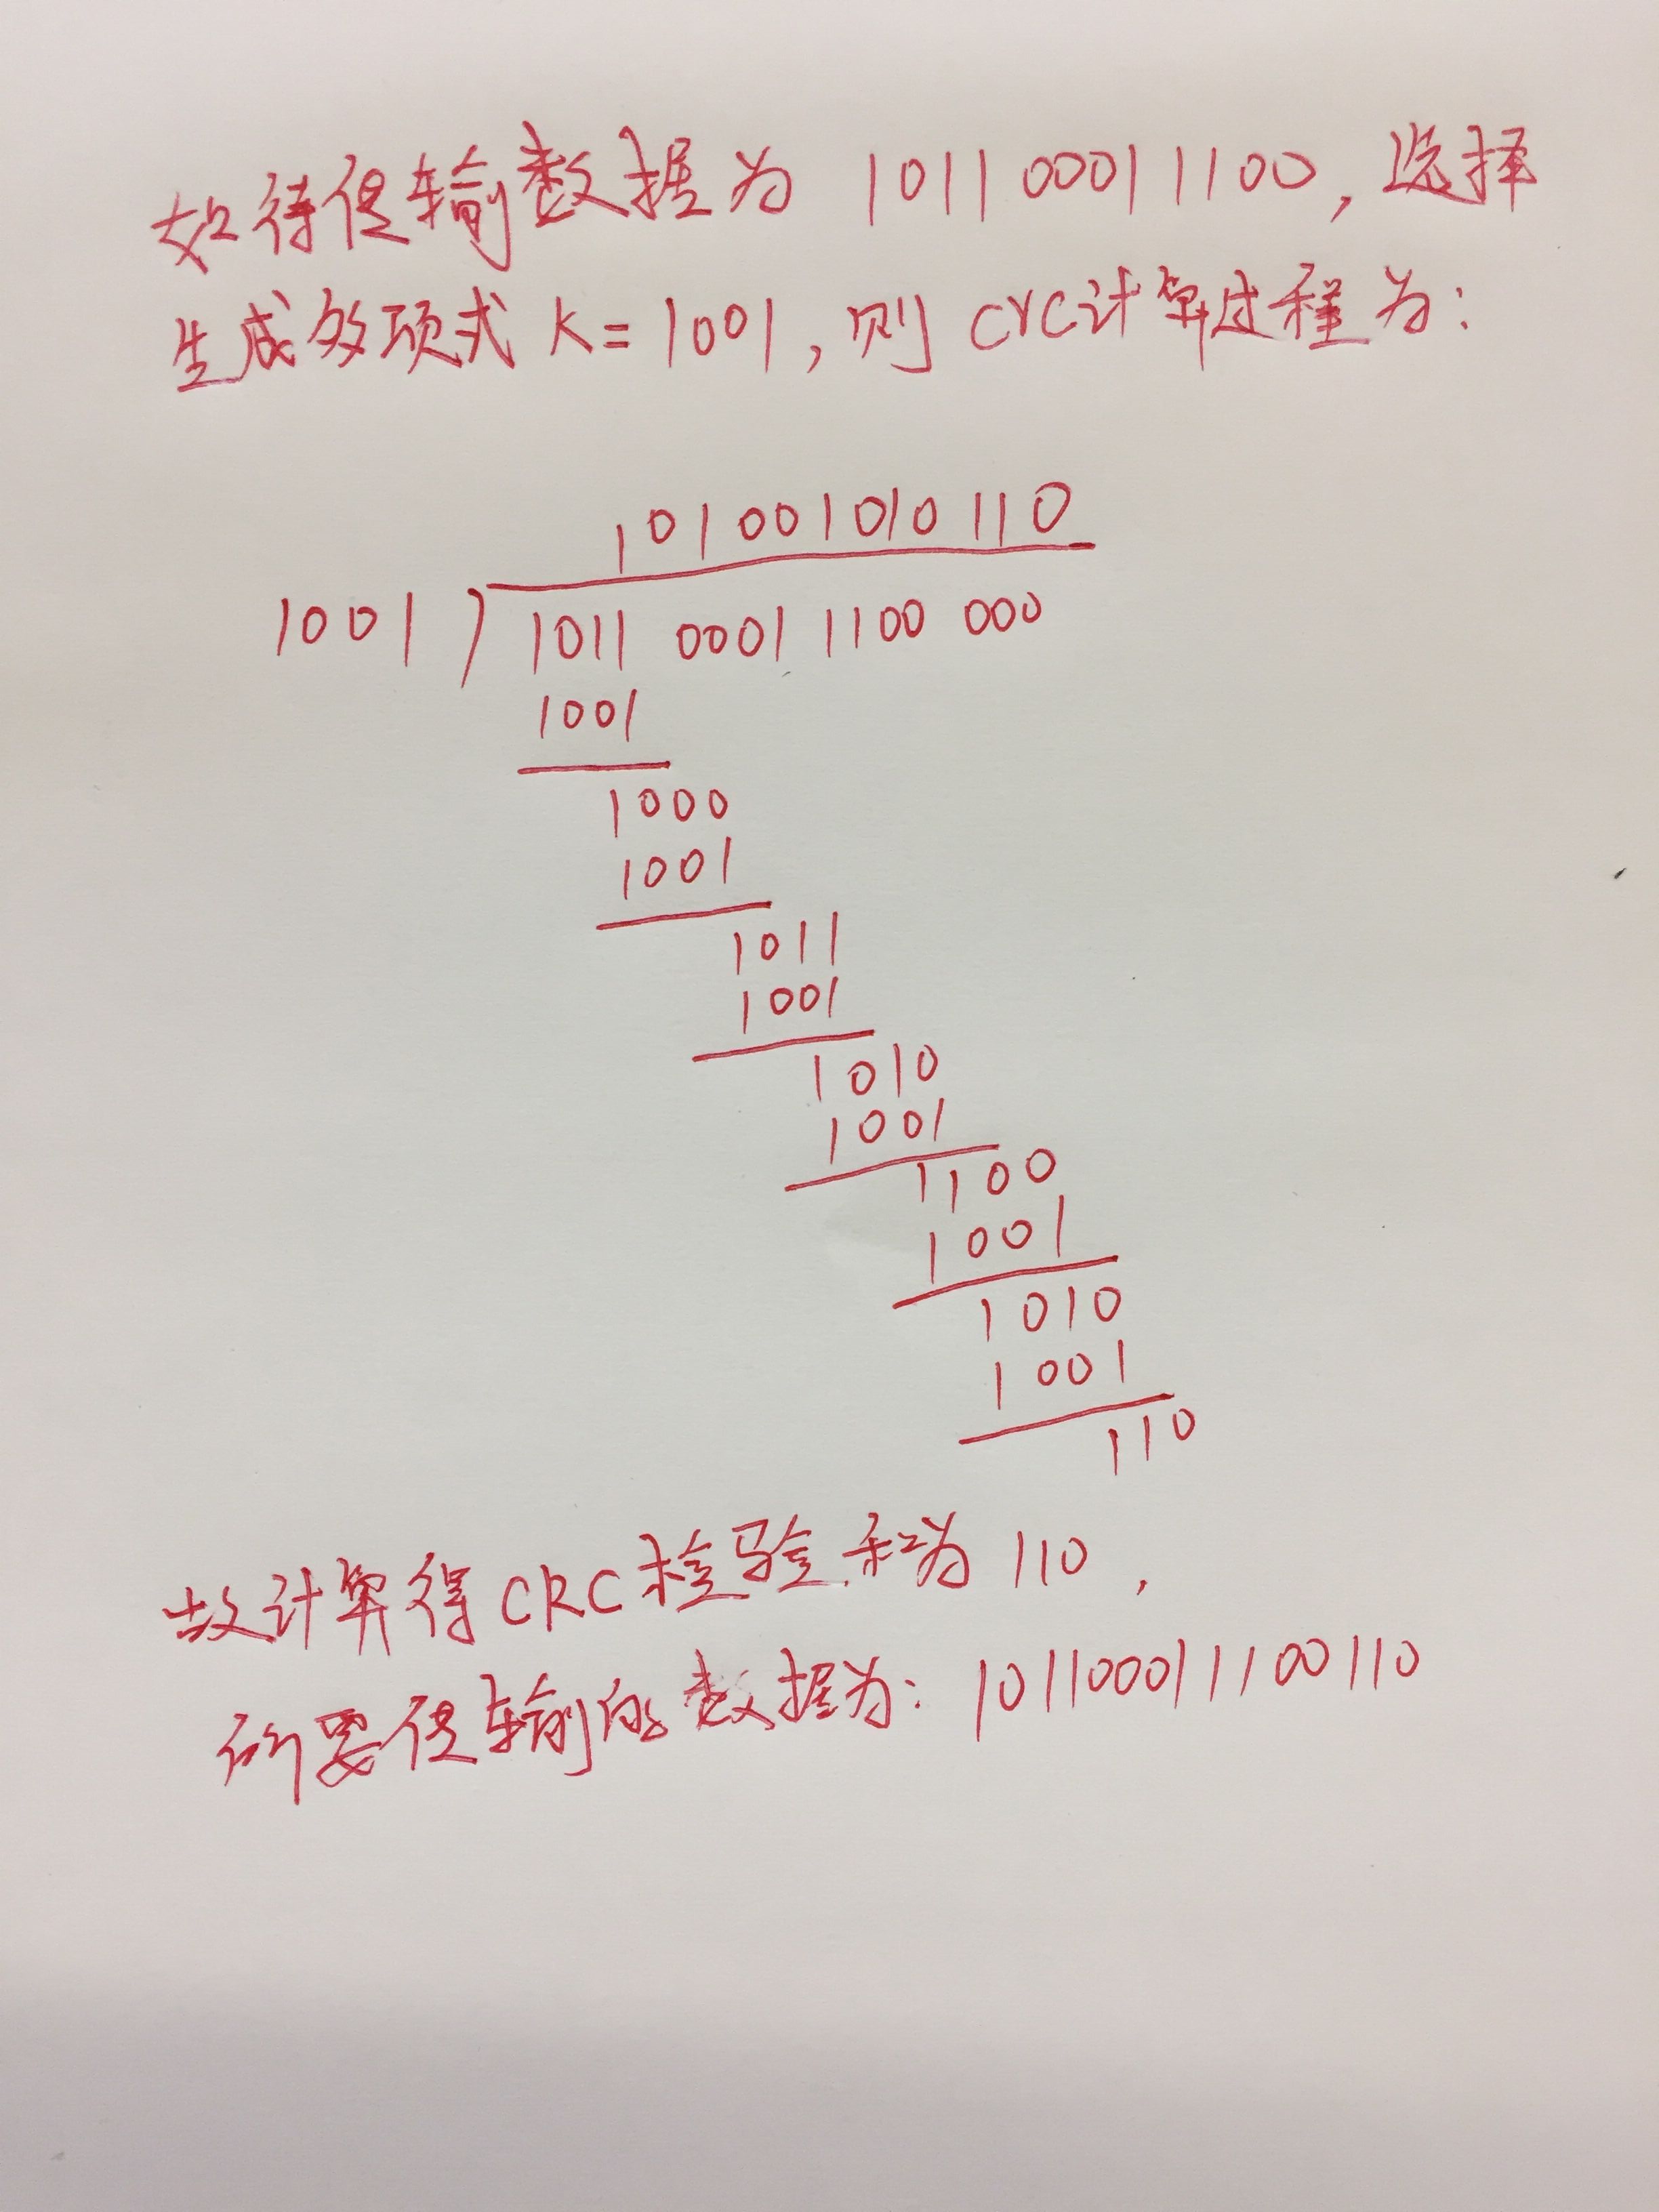
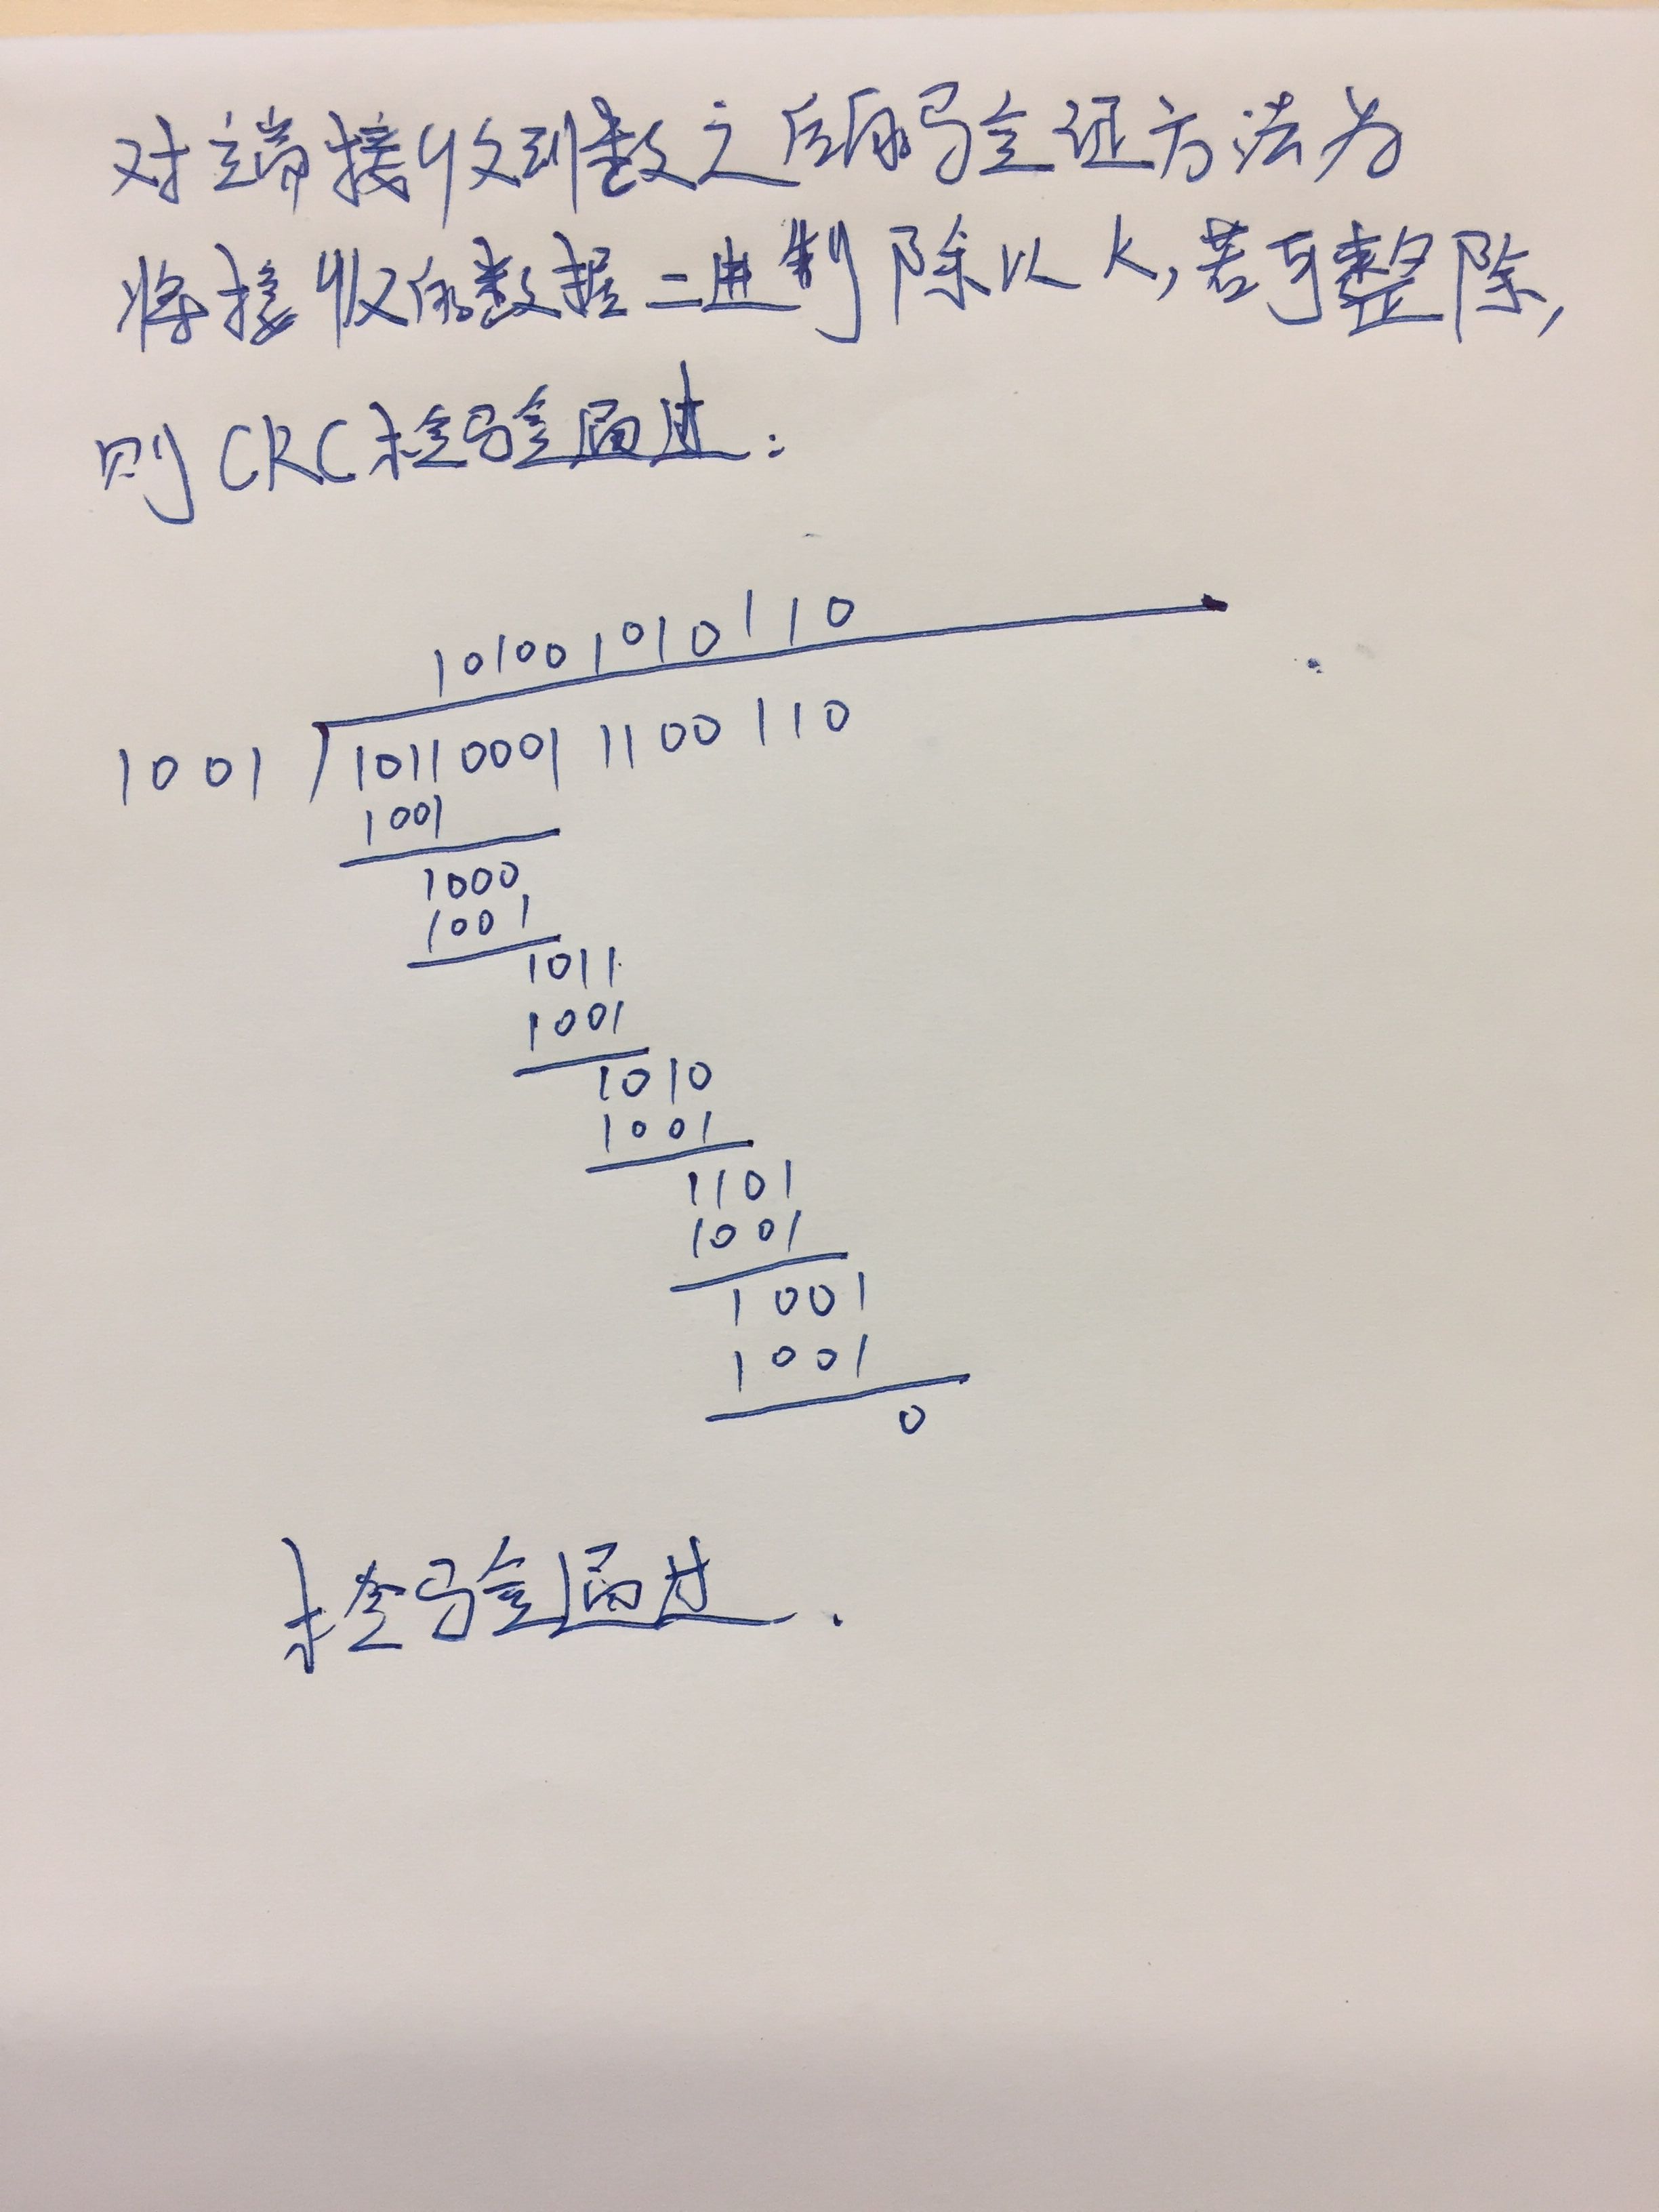
循环冗余校验的算法思想可以理解为选取一个生成多项式k,将需要传输的数据补位,使得补位后的数据可二进制整除该生成多项式,数据接收方校验数据的方法为看接收后的数据是否能二进制整除k:
 1. 将要传输的数据用二进制形式展开
2. 选定一个数K(称为**生成多项式**),K的二进制长度为W+1,则位宽为W
3. 在要传输的二进制数据后补W个0
4. 用二进制展开后的数据用二进制除法(不进位不借位,减法为二进制中的XOR)除以k,得到的余数即为循环冗余校验和。
示例如下:
影响CRC算法的因素
在实际使用,影响CRC的参数模型因素有如下几个:
- 宽度(WIDTH):即多项式的长度-1。
- 多项式(POLY):即生成多项式,上述示例中的k,要求生成多项式的最高位必须为1。
- 初始值(INIT):初始时CRC寄存器中的值,这个值常选为0x0000或0xFFFF
- 结果异或值(XOR):上述方法计算结果后再与该值异或即得CRC值。
为了使得校验出错率降到最低,业界研究出一些特定的生成多项式用于CRC校验算法。常见的CRC算法有CRC8、CRC16、CRC32、CRC64等等。
使用C语言实现CRC算法
以下算法参考redis源码中CRC16实现方法,是一种比较高效的实现方式。
宽度:16
生成多项式为:0x1021(x16+x12+x5+1)
初始值:0
结果异或值:0
|
|
使用boost库计算crc校验和
|
|
pthread使用barrier栅栏方式同步
Linux中提供了多种同步机制,其中使用barrier(栅栏)是多线程之间进行同步的方法之一。
基本原理:
假设多个线程约定一个栅栏,只有当所有的线程都达到这个栅栏时,栅栏才会放行,否则到达此处的线程将被阻塞。
使用场景:
程序启动的时候,需要建立一个独立的线程去做一些特殊的工作。比如这个线程需要初始化一些全局配置等等。而主线程启动后,必须等待这个子线程拿到配置信息后,才能继续工作。所以这里就存在一个问题要解决,主线程如何等待这个子线程完成工作后,才继续往下执行呢?
栅栏相关API
|
|
使用示例
|
|